
Widescreen HUDs explained
Most hardcore Quakers are using a customized HUD and since a few months ago, a new element has been added that allows HUDs to be scaled properly for widescreen. A lot of people seem to be aware that there is such a thing, but most don’t know how it works, however, it’s usage is pretty simple. I’ll explain by using a few images so you can edit your custom HUD as well.
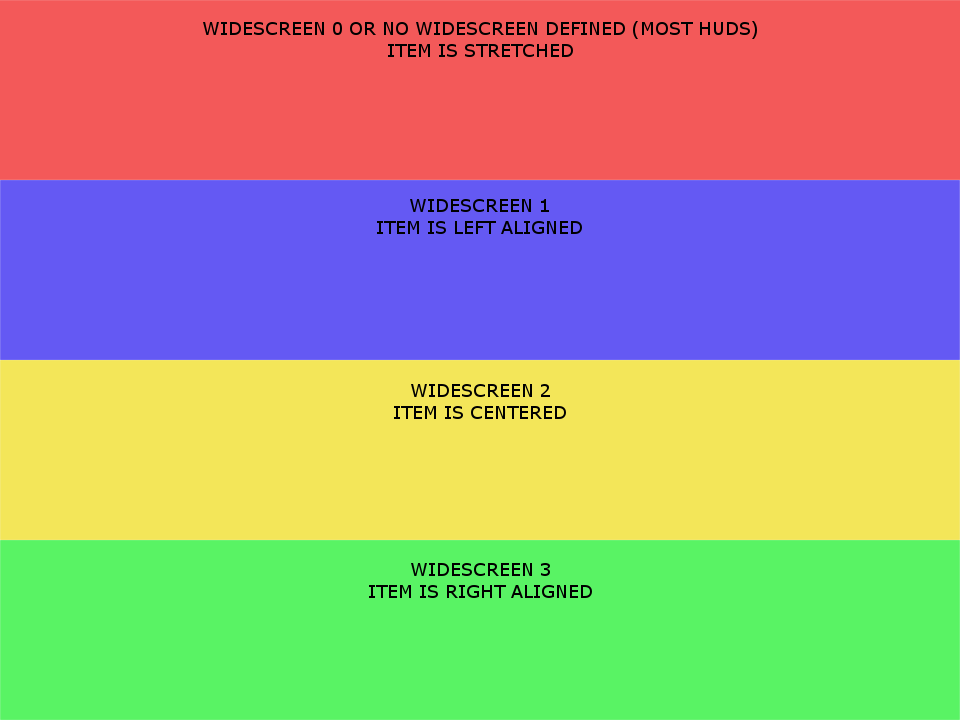
First of all, let’s take a look at the old situation. All HUDs were designed for a 4:3 aspect ratio with a resolution of 640×480. An item gets drawn on the screen and it scaled properly 1:1 if you were using a 4:3 aspect ratio in the game. By default, the definitions of the widescreen property don’t matter. A new widescreen property decides where an item gets placed when the HUD gets stretched to any given aspect ratio. It can be added to any menuDef or itemDef. You can set this new property to any value (0, 1, 2 or 3), as long as the aspect ratio is 4:3, nothing will look off, as you can see in the example:
It gets interesting when you do start stretching the HUD. That’s when the widescreen property kicks in. While the bounding box of the menuDef or itemDef still gets stretched, the content can be either left, center or right aligned. By entering value 0 or by omitting the property the menuDef (and with it the itemDef) will still stretch as it was in the old situation. The following image explains what would happen with the above image if we were to stretch the HUD.
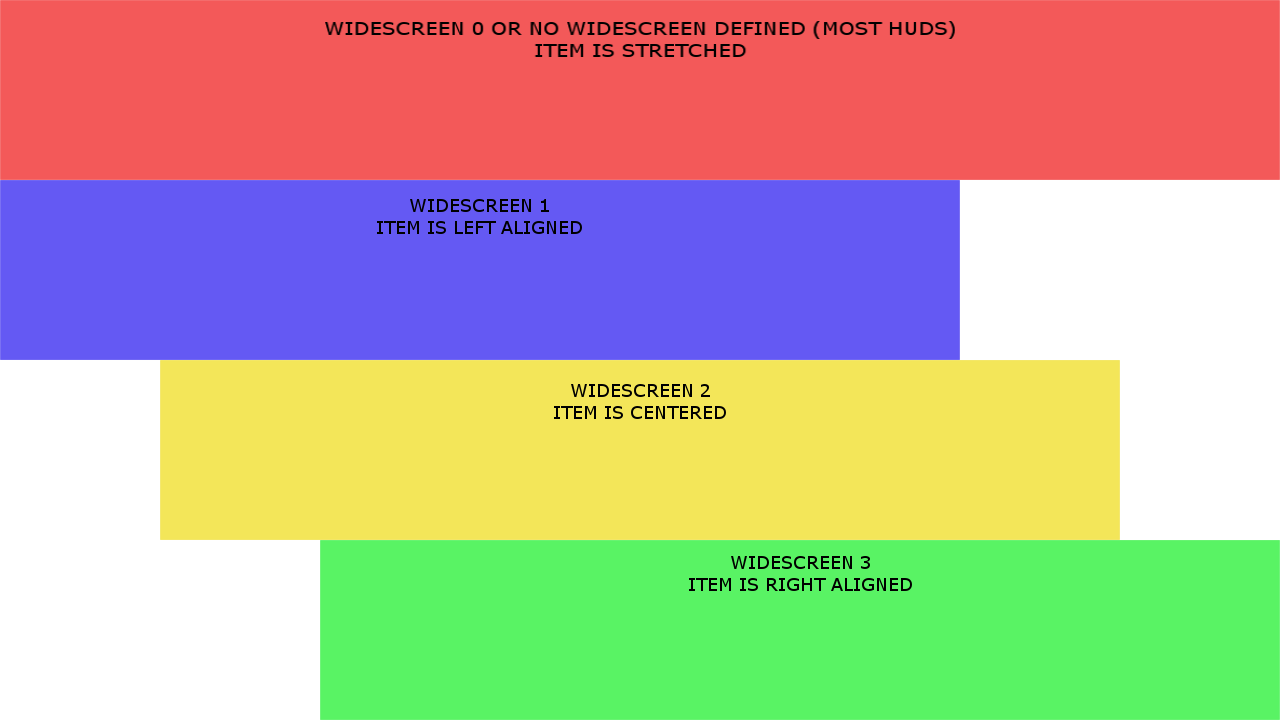
The elements that were defined in the first image get placed where the widescreen property tells them to be placed. Keep in mind that the box that is used to relatively place the HUD element is still being stretched, it’s the content inside the box that does not stretch, but rather “move” inside the box.
HUDs are built by defining menuDefs which contain itemDefs. You can either decide to put an entire menuDef in widescreen by defining it once there, and/or you can selectively add the widescreen property to itemDefs if you want specific sub-items to be placed elsewhere.
A very easy to understand example is the chatbox in Quake Live. It is defined by the following code:
menuDef {
    name "chatArea"
    fullScreen MENU_FALSE
    visible MENU_TRUE
    rect 0 301 640 120
    widescreen 1

    itemDef {
        name "boxBackground"
        rect 0 0  640 120
        visible 1
        style WINDOW_STYLE_FILLED
        ownerdrawflag CG_SHOW_IF_CHAT_VISIBLE
        backcolor 0 0 0 0.75
        background "ui/assets/hud/chatm.tga"
    }

    itemdef {
        name "chatWindow"
        ownerdraw CG_AREA_NEW_CHAT
        rect 3 -5 634 120
        visible 1
        decoration
    }
}
A menuDef is created that represents the entire chat area it’s as wide as the entire screen in a 4:3 ratio (rect 0 301 640 120). When the HUD gets stretched, the entire chat area gets aligned to the left side of the “640 wide” box. Inside the menuDef we have 2 itemDefs which define the gradient background (by loading image ui/assets/hud/chatm.tga) and the actual chat text itself. The gradient and chat are 2 seperate items defined.
This has the following outcome:

The chat and gradient align to the left, as you can see. If I wanted the gradient background to be right-aligned, I could add the widescreen parameter to the boxBackground with a value of 3.
itemDef {
        name "boxBackground"
        rect 0 0  640 120
        visible 1
        style WINDOW_STYLE_FILLED
        ownerdrawflag CG_SHOW_IF_CHAT_VISIBLE
        backcolor 0 0 0 0.75
        background "ui/assets/hud/chatm.tga"
        widescreen 3
    }
The result is that the gradient is now aligned to the right side of the ‘”640 box” that got stretched. keeping the item inside properly scaled.

However, in this example, a value of widescreen 0 applied to the gradient background, to explicitly disable the widescreen scaling, would have a much nicer result. It all depends on the item you want to put on the screen and while usually putting “widescreen x” in the menuDef is sufficient, sometimes it pays off to look more deeply into the code and adding it to an itemDef. A great example is the chat gradient:

Leave a Reply
You must be logged in to post a comment.